N3C – PHENIX Nose Cone Calorimeter Control
Table of Contents
N3C User Guide 1
Installation 2
n3c 2
ROOT 2
Connections 2
Powering on 2
Serial connection 2
minicom: cannot open /dev/ttyS0: No such file or directory 2
Commands 3
1. Download ColdFire 3
1.1 Download using BDM 3
1.2 Downloading using tftp 3
2 Start data capture program 4
3. Client commands 4
3.1 Load FPGA file to ColdFire 4
3.2 Configure FPGA (play FPGA file) 5
Playing STAPL file: 5
Playing XSVF file: 5
3.3 Download SVX4 chain 5
3.4 Initialize data taking 6
3.5 Enable data taking 6
3.6 Enable data sinking over ethernet (UDP protocol) to data capture program 6
3.7 Start run 6
3.8 Generate events internally 6
3.9 Stop run 6
4 Testing DAQ internally 6
HTML Server 7
Analysis 8
Example of the analysis 8
All software and documentation is mainained by subversion system, the repository is at https://svn.glitchinthe.net/public/n3c. To checkout everything – use follwing command:
svn checkout https://svn.glitchinthe.net/public/n3c
if this command fails then check that http_proxy environment variable is properly set, also make sure that the following lines in [global] section of /etc/subversion/servers are properly set:
http-proxy-host
http-proxy-port
The ROOT analysis toolkit is required for processing of the data files. The debian APT repository of ROOT packages and installation instructions are here: http://mirror.phy.bnl.gov/debian-root/
ethernet – Required to run test software.
serial – Debugging diagnostics is printed here. This port required when the application is not fully commissioned.
BDM – Required when serious debugging or often modification of the software is necessary. It allows remote gdb access to all on-board resources.
In normal conditions the 4 LEDs should be green: DUP, 100, LNK and +3.3
If Reset LED is red when BDM cable is connected then it means that bdm driver in linux was not initialized. Try to run run_target script as a root.
Communication program for serial port is minicom.
Fix:
# mknod /dev/ttyS0 c 4 64
# chmod 0666 /dev/ttyS0
In separate (debugging) window enter:
/home/andrey/n3c/quadros/Examples/Quadros_ss+OpenTCP/Mcf523x/n3c/Projects/gnu# ./run_target
The final part of response should be as follows:
dd if=./bin/image.gz of=./bin/image.bin bs=1024 seek=32 conv=sync &> /dev/null
m68k-elf-objcopy --input-target=binary --output-target=srec --adjust-vma 0xfff00000 ./bin/image.bin ./bin/image.s19
Detected MCF5282
 Coldfire debug module version is 0 (5206(e)/5272/5282)
[New process 42000]

Program received signal SIGGRANT, Monitor mode granted.
0x00000000 in ?? ()
Loading section .application_text, size 0x2cf4c lma 0x20000
Loading section .initialized_data, size 0x11a8 lma 0x50000
Loading section .rodata.str1.1, size 0x123a lma 0x4cf4c
Loading section name, size 0x3a lma 0x4e186
Start address 0x20000, load size 193384
Transfer rate: 96692 bits/sec, 508 bytes/write.

Program received signal SIGGRANT, Monitor mode granted.
The default tftp directory is /tftpboot. The binary file is copied to that directory automatically during ‘make’.
1) Make sure that tftpd is active on the server:
$ tftp localhost
tftp> get quadros_ss.bin
Received 268392 bytes in 0.0 seconds
2) Make sure that target is properly set. The ‘show’ command should print like following:
dBUG> show
        base: 16
        baud: 19200
      server: 192.168.0.1
      client: 192.168.0.2
     gateway: 255.255.255.255
     netmask: 255.255.255.0
    filename: quadros_ss.bin
    filetype: Image
     ethaddr: FF:FF:FF:FF:FF:FF
The downloading is done using ‘dn’ command in dBUG:
dBUG> dn
Ethernet Address is FF:FF:FF:FF:FF:FF
Downloading Image 'quadros_ss.bin' from 192.168.0.1
TFTP download successful
Read 266664 bytes (521 blocks)
After downloading it is wise to make reset and then one can start the program using ‘go 20000’:
dBUG> reset
Software Reset
ColdFire MCF5235 on the BCC
Firmware v3b.1a.1a (Built on Jul 21 2004 17:31:28)
Copyright 1995-2004 Freescale Semiconductor, Inc.  All Rights Reserved.

Enter 'help' for help.

dBUG> go 20000
THREAD4 recycle = 010
THREAD1 recycle = 000
HTTP service for 07 connection
datasink initializing... ... done
Starting insyst.c
CLKTICK=0001
OpenTCP Initialization Complete!
When system is working, one can break the main program and exit to dBUG monitor using ‘exit’ command in n3c.phy. To continue again – use ‘go’ command in dBUG.
The data capture program could be running on any workstation at the same network subnet.
~/n3c/client$ ./daqcapture
datasink
ready for data
~/n3c/client$ ./n3c.py
<< lsdv
Devices found:002
This is correct response. If you get “JTAG cable is not connected” then check following
FEM is powered
FEM is properly connected to ColdFire board
The more convenient to work with STAPL files. They are shorter and better manageable.

<< upload s jtag/spxfem.stapl
>> File stored.

The ‘s’ here is the tag where the file will be stored, it can be any word.

The XSVF files could be played faster. They are also more reliable. Usually we store them under ‘x’ tag.

<< upload x jtag/spxfem.xsvf
<< splay s xRUN_XILINX_PROC
>> JTAG playing file.
Successful File Execution.
success
JAM player returned 00000000 line 0000 code 00000000
>> JTAG finished playing file.
<< xplay x
>> JTAG playing file.
>> JTAG finished playing file.
You may check if download went properly using following command:
<< lsdv p
IDCODE=31028093, expected 31028093
USER1.0=0
USER2.0=6df00000
USER1.1=0
USER2.1=0
USER1.2=1000
USER2.2=0
USER1.3=2000
USER2.3=0
IDCODE should match expected number, first digit of USER2.0 is version number (modulus 16), second digit – 1-second counter.
<< upload v jtag/ped.fem
>> File stored.
<< jsvx v
In minicom window you should see something like this:
args: v,
loading 76030(180)
0000000100000001000000010000000100000001000000010000000100000001
0000000100000001000000010000000100000001000000010000000100000001
0000010001010101100000000000111101100000000111111111000000001000
0000000100000001000000010000000100000001000000010000000100000001
0000000100000001000000010000000100000001000000010000000100000001
0100000001010101100000000001111111100100011000000011000000010001
Ready for taking triggers
Triggers could be generated using 'jusr t' command
loaded 77008(180)
1000000100000001000000010000000100000001000000010000000100000001
0000000100000001000000010000000100000001000000010000000100000001
0000010001010101100000000000111101100000000111111111000000001000
0000000100000001000000010000000100000001000000010000000100000001
0000000100000001000000010000000100000001000000010000000100000001
0100000001010101100000000001111111100100011000000011000000010001
Make sure that loading and loaded sequence are identical, if not – repeat the command.
jusr i
Ready for taking triggers
jusr u
<< dsht 192.168.0.1 31337
>> DATASINKING host is set.
The dsht command above instructs to send data to UDP port 31337 at data capture client with IP address 192.168.0.1
>> dsst
>> DATASINKING has started.
the data capture should respond:
Start Run 070413175210.dq0
To generate 1024 (210) events
<< jusr t 10
The easiest way to find if data taking is in progress – watch the data file grow.
<<dssp
>> DATASINKING has been stopped.
data capture should respond:
Stop Run. Downloaded 0x41bfa bytes
Make sure that daq_tst directory replaces daq directory in ...n3c/Progect/gnu/Makefile.
Tell server on which port sto send UDP data:
<< dsht 192.168.0.1 31337
>> DATASINKING host is set.
Make sure that ~/n3c/client$ ./daqcapture is running.
Take 100000 events:
<< dsst 100000
>> DATASINKING has started.
Stop run and force daqcapture to close the file when you like.
<< dssp
>> DATASINKING has been stopped.
Run suspended at event 0x000186a0
Analize the file just created using ROOT macros from n3c/analysis
The status of the system is accessible at http://192.168.0.2/
Make shared library Tn3c.so if it was not done before:
/phenix/n3c/analysis$ make
g++ -O -Wall -fPIC -pthread -I/usr/include/root -c Tn3c.cxx
g++ -O -Wall -fPIC -pthread -I/usr/include/root -c Tn3cDict.cxx
g++ -shared -O  Tn3c.o Tn3cDict.o  -o Tn3c.so
Tn3c.so done
Start ROOT:
/phenix/n3c/analysis$ root
*******************************************
* *
* W E L C O M E to R O O T *
* *
* Version 5.12/00 10 July 2006 *
* *
* You are welcome to visit our Web site *
* http://root.cern.ch *
* *
*******************************************
FreeType Engine v2.1.9 used to render TrueType fonts.
Compiled on 11 July 2006 for linux with thread support.
CINT/ROOT C/C++ Interpreter version 5.16.13, June 8, 2006
Type ? for help. Commands must be C++ statements.
Enclose multiple statements between { }.
root [0] .x init.C
gSystem.Load(Tn3c)
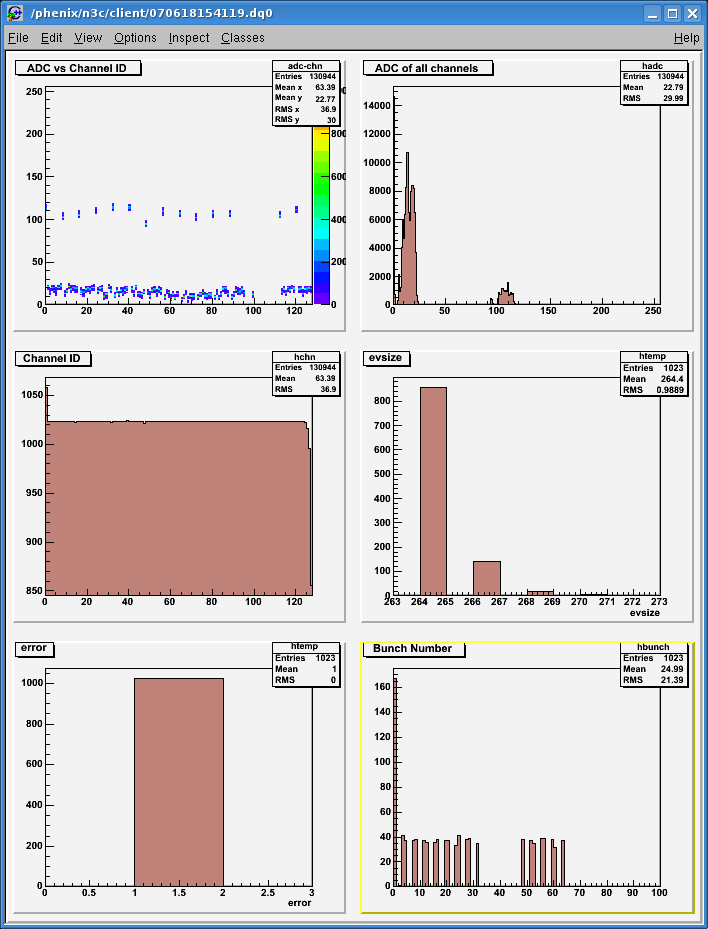
root [1] .x go.C("/phenix/n3c/client/070618154119.dq0")
Macro for processing n3c files
Tn3c n(/phenix/n3c/client/070618154119.dq0) > Opening /phenix/n3c/client/070618154119.dq0
File opened /phenix/n3c/client/070618154119.dq0
filesize = 270740
Output file /phenix/n3c/client/070618154119.root
TTree *t=n3c->MakeTree(); > ID 8310, ev# 00000000 at 00000108: 8310 0057 0100 0200
ID 0000, ev# 00000001 at 00000212: 0000 8313 0070 0113
ID 0000, ev# 00000002 at 0000031c: 0000 8317 0070 0114
ID 8314, ev# 00000003 at 00000424: 8314 0071 0115 020e